...

Tuesday, 17 February 2015

HEALTHY PROTEIN PANCAKES


HAPPY PANCAKE DAY!

So I know this recipe is very belated as you've already all made your pancakes, so please forgive me... And try them out on the weekend! Weekends are 10000X fuelled by breakfast pancakes??

I had these as brunch and they were yummy-scrumptious.

For these I used PB2 white chocolate protein peanut butter for this recipe, but a healthy nut butter would work too as it's naturally high in protein! I also used a gluten-free flour which is cheap enough to pick up in your local supermarket! For even more protein, you can add flax or chia seeds for a natural protein boost, or some protein powder for the protein-enthusiasts.

You will need:

  • 100g gluten free flour
  • 2 medium-sized eggs
  • 3 tablespoons protein nut butter
  • 1 tablespoon honey
  • Coconut oil
  • Fat-free natural yogurt to serve
Steps:
  1. Mix all of the ingredients - I did this with a hand blender, otherwise you'll struggle to mix the nut butter evenly.
  2. Heat the coconut oil in a pan (about 3/4 of a teaspoon) for a little while on a medium heat and add about 3 tablespoons of pancake mixture.
  3. Cook as you would a normal pancake, using a spatula to flip until golden-brown.
  4. Serve up with your favourite topping and enjoy a protein-boosting treat!
I had some with natural yogurt and a drizzle of honey, and also had some heated with banana slices and a little honey. Both were super good! And microwave re-heating worked surprisingly well! I hope you enjoy!

Courtney xx

Wednesday, 11 February 2015

HEALTHY VALENTINE'S DAY VEGAN TRUFFLES


So the weekend is looming and that means Valentine's Day! I for one am very excited!!

And what better way to celebrate than with (semi) healthy truffles! And YES, there is such a thing! Plus they're super easy too! And they taste like very guilt-ridden chocolate truffles (but of course they're not) aka SCORE! So let's get to it!

You will need:
  • 1 cup dates
  • 1/2 cup cashew nuts 
  • 80ml of water
  • 1/4 cup cocoa powder (raw cocao powder would be even better - unfortunately I couldn't get hold of any - but Waitrose do sell cocao for those of you in the UK)
Steps:
  1. Pour the cashew nuts into a food processor and blitz on high for about 2 minutes until they form a cashew powder. Pour out of the food processor and put aside.
  2. Add the cocoa/cocao powder to the cashew powder and mix.
  3. Add the dates and water to the food processor and blitz on high for about 2 minutes until they form a paste.
  4. Add the cashew and cocoa powder mix to the food processor and mix again for a further minute. Eventually you should end up with one big ball of mixture - a giant truffle!!
  5. Use a teaspoon to spoon out mixture and using the palms of your hands, roll into balls and roll in dusting. I also made some truffles which I rolled in desiccated coconut which is less traditional but I loved (and preferred)!
  6. And enjoy with a glass of champagne or as a cute gift idea, place some tissue paper in a small gift box and put some of your lovely truffles inside!
Happy Valentine's Day for Saturday! Courtney x


Saturday, 7 February 2015

BANANA OATMEAL BITES TO REPLACE YOUR 'COOKIE JAR'


Hello! So to stop me digging through the biscuit barrel, I made my own little healthy 'cookie jar' with tiny little banana oatmeal bites! These are totally healthy, completely vegan and so so so simple and quick to make!

This is just bite-size versions of this recipe here from earlier this week, but I thought I'd share this cute little idea with you!

Have a beautiful day! Courtney x

Sunday, 1 February 2015

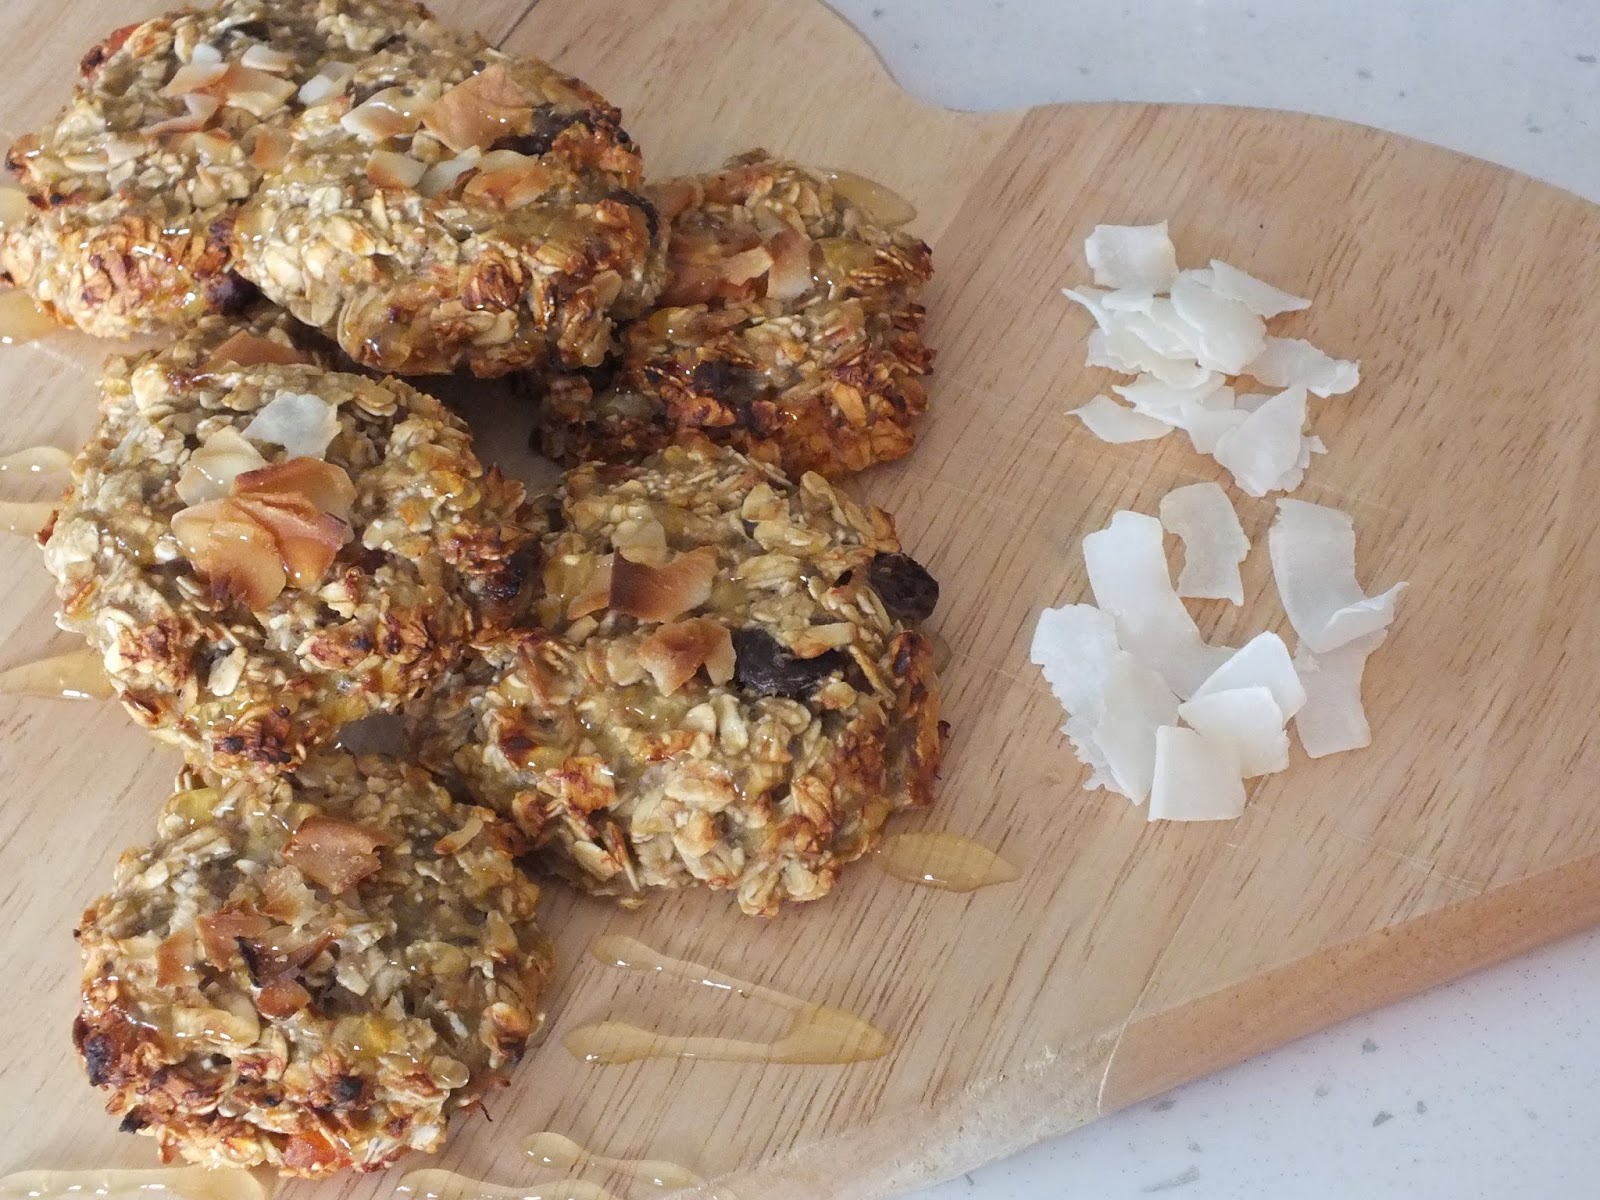
OATMEAL BANANA BOOST COOKIES


These are wondrous, wondrous little beauties. Honestly, they're magical...

They only have a few ingredients, they're packed with goodness, they'll give you energy AND you can have them ready to eat 20 minutes from now! They're nice and crispy on the outside and moist and banana-y on the inside, YUM! With their slow-release energy they make perfect breakfast cookies, or on-the-go snacks for work or hiking etc!

Now I made these today because a) at the moment I have an overwhelming urge to eat cookies/biscuits and thought that if I make a healthy alternative at least it won't be so bad if I fail to keep these cravings at bay and b) I have a lot of bananas left over c) I had run out of healthy snacks and literally only had 20 minutes to spare before I had to leave the house! 

For this, I used wholemeal oats with raisins and papaya (you can literally use any kind of healthy oats)!

Cooking and preparation time: 20 minutes total

You will need:
  • 2 medium sized bananas (the softer the better)
  • 1 cup oatmeal
  • 1 tablespoon honey
  • A few coconut flakes (optional)
Steps:
  1. Preheat the oven to 200° C for fan ovens and 220° for conventional.
  2. Use a potato masher to crush the bananas until they're a runny mixture.
  3. Add the cup of oatmeal and tablespoon of honey to the banana and mix well.
  4. Place a sheet of baking paper on a tray and use a tablespoon to spoon the mixture onto the paper and pat down and shape using the spoon.
  5. Place a few little coconut flakes/desiccated coconut on top of the cookies.
  6. Place in the centre of the oven for 15 minutes.
  7. Remove from the oven and leave to cool on a cooling rack.
  8. Drizzle with honey and enjoy as breakfast cookies or as an on-the-go healthy snack!
Have a beautiful day! Courtney x


Saturday, 24 January 2015

HEALTHY BANANA BREAD


Who doesn't like banana bread? Moist and comforting banana bread. Mmmmmm.

This recipe is quite simple, and quite healthy too because of the substitutions. Now this recipe includes plain and self raising flour, but it depends how fluffy/moist you want your bread. If you want really fluffy light bread then use more self raising, if you want more dense and moist banana bread (how I prefer it) then use more plain wholemeal flour. As long as the overall flour amount is 240g it doesn't matter. Note, this recipe works a lot better with really overripe, even brown bananas - so don't throw your old bananas away!

You will need:

  • 140g plain wholemeal flour
  • 100g self-raising wholemeal flour
  • 3 medium eggs
  • 1 teaspoon baking powder
  • 1 teaspoon bicarbonate soda
  • 300g overripe mashed bananas (about 3 medium bananas)
  • 140ml natural yogurt (I used fat free greek style natural yogurt)
  • 4 tbsp agave nectar (or honey/your desired liquid sweetener)
  • Walnuts to finish

Thursday, 22 January 2015

SUPERFOOD BLUEBERRY JAM - SO SIMPLE AND DELICIOUS THAT YOU SIMPLY MUST TRY IT


Today has been a jam packed day!

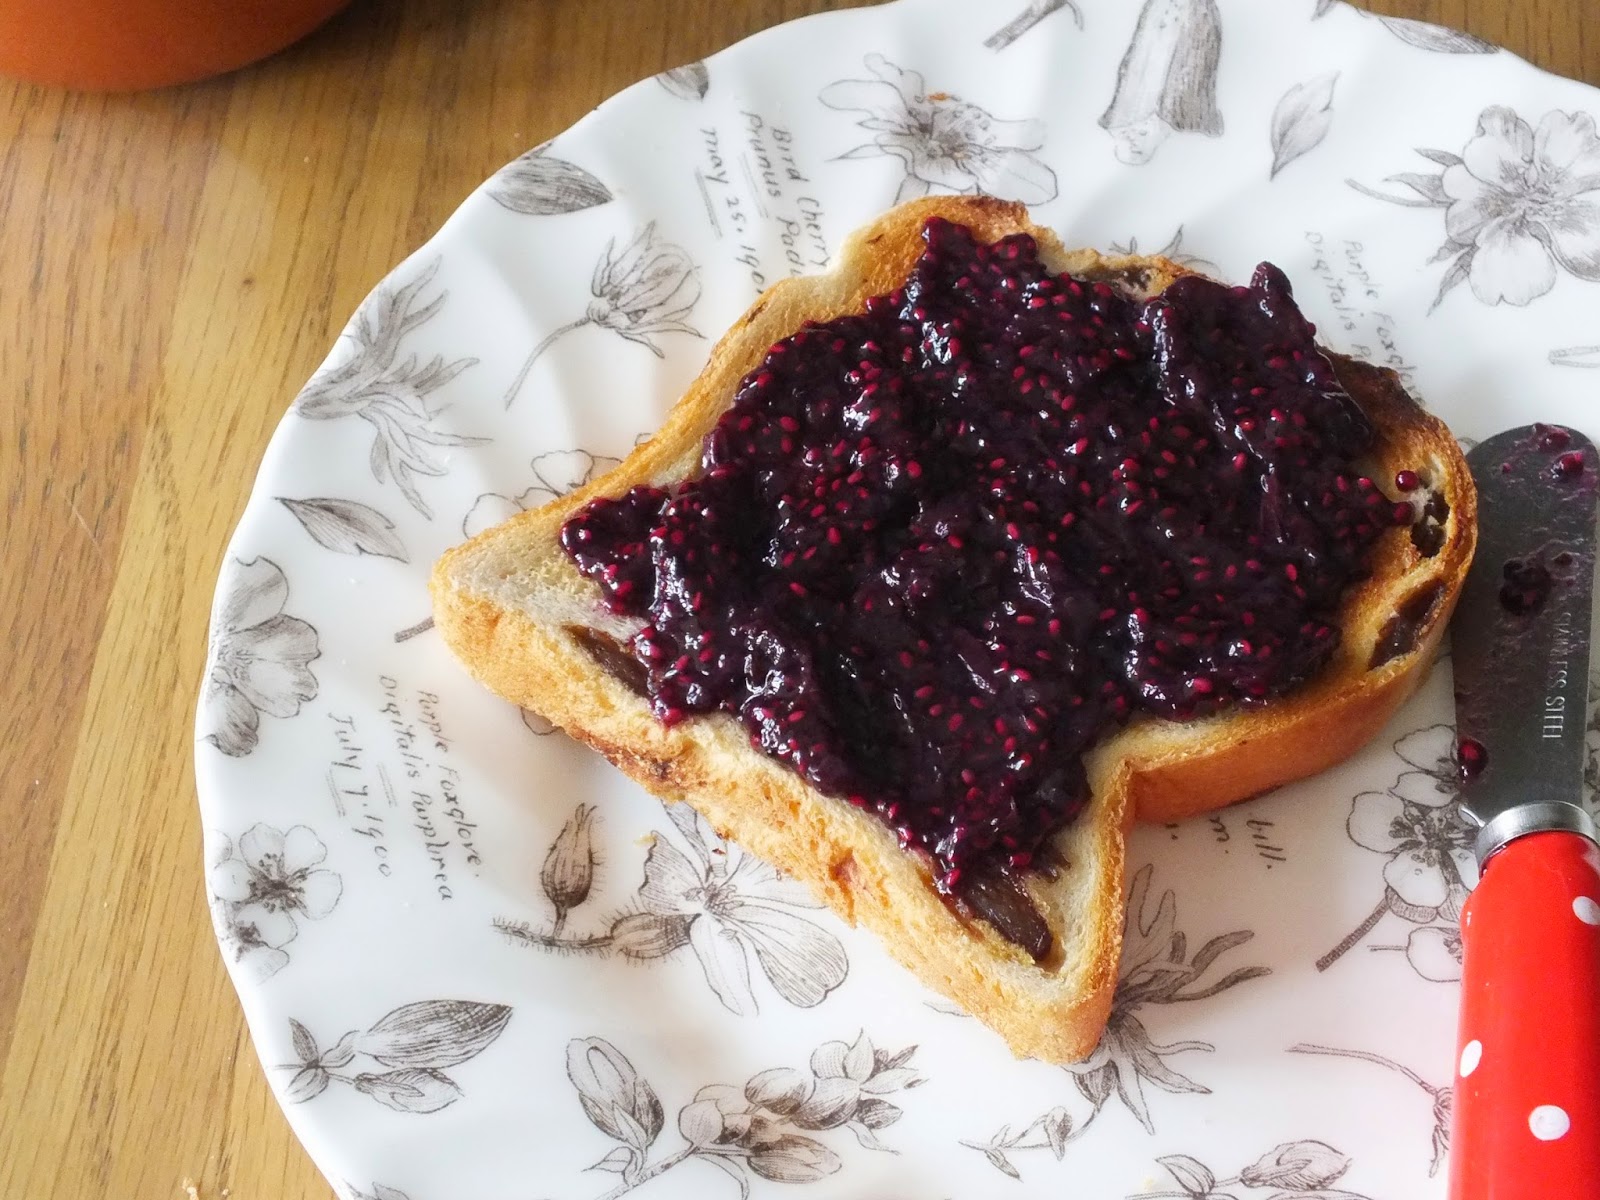
Haha I couldn't resist... But seriously, I made two types of jam today, and this is the first! Blueberry chia jam. Now this is gorgeous. Utterly delicious and SO full of goodness. Like MEGA healthy jam?? Who knew that was possible.. And now I REALLY can't understand why they pack so much sugar and junk into supermarket jam because YOU JUST DON'T NEED IT! This is so naturally delicious and sweet! Please note, this recipe makes a small pot of jam (the one seen above) so is ideal for a breakfast treat for 2-4 people. Especially as blueberries can be expensive! But feel free to double, triple, quadruple the recipe to make a large pot. I enjoyed this natural jam on a slice of fruit loaf, DELICIOUS! Do note, the chia is quite important in thickening the jam.

You will need:
  • A small punnet of blueberries (about 150g)
  • 1 tablespoon agave nectar or honey
  • 1 tablespoon of chia seeds
(yep, that really is all)...

Steps:
  1. Add the blueberries and your desired sweetener to a small saucepan and turn on the stove to a medium heat. As you start to heat the blueberries, use a potato crusher to squash the blueberries (I wouldn't advise blending as you'll lose the lovely texture).
  2. Once the mixture starts to boil after about five minutes, add the chia and turn down to the lowest heat to simmer for about 10-15 minutes or until you've reached your desired thickness.
  3. Enjoy on toast, fruit loaf, yogurt, granola, etc, etc! THAT'S IT!

Sunday, 18 January 2015

A GREEN, LEAN, MEAN SMOOTHIE!


This cup of all green smoothie is yummalicious! And it has got an AMAZING amount of vitamins and nutrients packed into it, in the super combination of avocado, kiwi, spinach, chia and banana to give you long-lasting energy! Perfect for breakfast, or to keep you going between meals.

You will need:

  •  3 small kiwi
  • A dense handful of spinach
  • 1 banana
  • 1 small avocado
  • Teaspoon chia seeds
  • (A teaspoon of honey/agave nectar to add sweetness if preferred)
Steps:
  1. Blend up the spinach with a little water first until that it smooth and then add the other ingredients. 
  2. Blend up the ingredients, adding water until the smoothie reaches the 700ml line.
  3. Enjoy!
P.S If you don't want to add so much water, you could add some natural yogurt.

Courtney x


Monday, 12 January 2015

ANOTHER HOLLAND AND BARRETT TRIP


So I took yet another trip to Holland and Barrett yesterday to buy some wonderful new things. And got some great deals too as the penny sale is on!

As per usual I bought lots of new teas to try and my tea collection is now really quite absurd! I have a full caddy of tea in my tea box and 7 other boxes! But tea is wonderful so who cares (I'm just running out of room to store it all)!

I also got some yummy goodies...


Up until now I had not tried agave nectar as I love to sweeten things with honey and have always been quite content with that, but I thought I need to give it a try. It'll be better for things like baking where I don't necessarily want the honey flavour but need to sweeten it. I also bought some Yo Yos (which I call Yo Yo Bears - not sure if the bear part is included in the name??) but they're just yummy junk-free fruity goodness so you can't go wrong there!

I also thought I'd try one of the Dr.Organic lip balms as Holland and Barrett seem to love this brand and this lipbalm smells and feels amazing on my lips!


I also bought some vitamins but I'm going to do a separate post about vitamins and supplements shortly so 'stay tuned' for that!

Courtney x

Wednesday, 24 September 2014

(Almost) flourless simple, delicious and healthy banana pancakes!


These are the absolute yummiest Sunday morning breakfast treats! And in fact, made with (almost) just banana and egg they're full of slow-release carbohydrates to carry you through to lunch time and the eggs make them high protein, so they'd be brilliant as a post-workout breakfast. What's wonderful about them is that the ingredients are so simple and you'll probably already have the main ingredients: egg and banana. I did actually add 2 tablespoons of flour to mine, but if you're feeling up to the challenge, leave it out! Pancakes are never the easiest thing to make, so I've added some tips at the bottom of this page to read before you start.

This recipe, I would say serves two, and that's a couple of small pancakes each (about 3/4 each).

Cooking and preparation time: 20 minutes

You will need:

  • 1 1/2 large bananas or 3 mini bananas
  • 2 medium eggs
  • 1/2 teaspoon vanilla extract
  • 1/4 teaspoon baking powder
  • 2 tablespoons plain flour
  • Butter and olive oil for frying (coconut oil is even better)
  • Yogurt, fruit and honey for toppings (optional)
Steps:
  1. Firstly, mash the bananas with a potato masher or fork and add to a mixing bowl. Crack the eggs and add the other ingredients. I blended these with a hand-blender, but you can use a whisk if you don't have a hand blender.
  2. Add a small knob of butter to a pan and a very small dash (half a teaspoon of olive oil) on a medium heat or a teaspoon of coconut oil. As these melt and heat, mix gently in the pan with a wooden spoon trying to keep the butter and oil in a circle in the centre of the pan if you're using a large pan, if you're using a very small pan you can cover the base of the pan.
  3. I used a large serving spoon to spoon the mixture into the pan (probably about 2 tablespoons of mixture.
  4. Let this cook on a medium heat for a little while. Use a spatula to just lightly lift under the edges. Lift the pancake up slightly to see when the base is golden-brown. When it is use the spatula to flip the mini pancake over and cook the other side also until golden-brown. The pancakes tend to take 2-3 minutes. Once both sides are golden-brown, use the spatula to serve the pancakes onto plates.
  5. To cook the next pancake, remove any leftover bits as they'll burn otherwise, and you may need to add another small amount of butter and olive oil.
  6. Add your toppings and enjoy!
Tips!
  • Now, I must admit, they don't look exactly the same as normal pancakes... The banana, once cooked, makes the pancakes almost brown, and the pancakes are quite thin, BUT they are absolutely delicious!
  • I must say that the bananas do have to be overripe - preferably with the brown spots. This means that the bananas cook much more easily and are so much sweeter and nicer.
  • This recipe is a great way to get rid of old bananas that are hanging around.
  • Do not let the pan get too hot! Medium heat is enough, otherwise they will burn.
  • I added low-fat greek style yogurt, fresh raspberries and a drizzle of honey over my pancakes and it was absolutely delicious. Any type of yogurt with berries will work wonderfully.

Sunday, 17 August 2014

My first Graze box experience!


So I decided to order my first Graze box, which everyone knows is free some way or another - perhaps you got a token with an Amazon order, or clicked a link - but if you look around for 5 minutes on the web (or even at home) you're sure to be able to get your first one for free and save yourself the £3.99. Which is good, because you need to decide whether or not you like it. You do have to put your card details in, but if you change your preferences to have a box delivered, for example, once every two months, it gives you a very long time before your next box is on its way and hence a very long time to cancel your Graze boxes. You could even cancel your deliveries as soon as your graze box has been dispatched if you're worried you'll forget to cancel it. So in short, don't worry about being overcharged.

How does Graze work? Well first you can select your dietary preferences because if you're vegetarian, you don't want to be sent beef jerky for example! You can also choose to disregard things like spicy food, gluten-containing food, dairy food, etc. And then you can, if you wish, narrow down the vast list of options by selecting a type of box. I chose the 'light' box first of all. After this you can scroll through a huge list of options for the graze box, all with pictures and you can select 'bin' so that the item never gets sent to you, 'try' which is pretty self explanatory and then 'like', 'love' and 'send soon' which just kind of orders all of the products into what you'd rather have and soonest.

When the box arrives! When the box first arrived I was amazed at all of the little things that come with it, including two £5 vouchers to give to a friend to try the graze box too, and introductory booklet and also with every order a dietary guide. I was kind of expecting the snacks to be a bit hit or miss with regards to what's in them, but I was wrong! With every order you get full details of the food's contents just as you would on supermarket products.

And finally the snacks! The snacks are super nice and really good for nibbling on throughout the day perhaps at your work desk or watching your favourite programme. They put together different, natural products to find flavours similar to our favourite calorific guilty pleasures, such as the jam donut which you can see in the picture above. And it actually gave a jam donut kind of flavour! All of the goodies were really nice, nibbly treats which are very natural and low calorie and fat too. So I've asked for my next box in the following week!

I really recommend you give these a go! :-)

Tuesday, 5 August 2014

Delicious new bars I've tried, from PowerBar and The Food Doctor, packed with protein and other yummy goodness!


So last weekend, as you may have seen in a previous post, I did a mini haul in Holland and Barrett and picked up lots of new things to try. Well... Now I'm finally getting around to telling you about these bars!

First of all, the vanilla and coconut flavoured 'protein plus' PowerBar. Before I get on to anything else... THIS WAS DELICIOUS! I'm a huge fan of anything coconut flavoured and I also love vanilla flavouring and these are just perfect. They're soft and spongy bars of yumminess! They're coated with a sneaky, thin layer of white chocolate which also make the bars really tasty. These bars come in at 191, which actually, for a protein bar, is considerably low! And this certainly isn't because the bars are tiny - they're quite chunky, 55g bars, compared to the lovely Nakd bars which are 30/35g. SO, for less than 200kcals you're getting a chunky 55g bar, 17.3g of which is protein and they're delicious too! The Institute of Medicine recommends that at least 10% of daily calories should come from protein so, and especially if you a gym-junkie and trying to tone up and/or build muscle, eating one of these bars should be a totally guilt-free and delicious way of getting protein. The bottom line is, I really recommend these bars for their chunkiness, tastiness and high protein content!

Now onto the mango and fig The Food Doctor bar! This bar is really quite different, and I'd call it a kind of 'robust' food because it's chewy and crunchy due to all of the nutritious seeds and grains it's contains, and with that of course protein! They're a really interesting and tasty snack and because it takes a while to chew and eat, you don't feel dissatisfied when the bar disappears in 10 seconds! These bars have 9.7g of protein from totally natural sources which is truly great because it's a great way to get protein and you don't have to worry about eating unnatural and processed protein. As well as this, the bar is totally vegan and only contains natural ingredients so everyone can enjoy it! It's 37.3% fruit (mango, figs and papaya) and then is also packed with sunflower kernels, hemp seed, linseed, quinoa, rice bran and buckwheat puffs, all of which come with their own benefits! It's free of wheat, dairy and soya and like I said, totally vegan - so anyone can enjoy these bars! Oh! And also, for all of this goodness and crunchy, chewy yumminess, they're only 103 calories - so what's not to love? I also wholly recommend this bar!

Finally, I can't really decide which bar I prefer! They're both quite different, and both great for different reasons, so give them both a try! Perhaps if you're more of an athlete, try the PowerBar and if you're just a foodie, then go with the Food Doctor bar! I hope you give them a go and love them as much as I did! :-)


Sunday, 3 August 2014

Super healthy, easy banana ice cream that you have to try!


I really, really, really cannot understand why this SUPER simple 2-ingredient, vegan recipe is SO GOOD? But it is! And made of JUST banana and almond milk, it's super nutritious, very low in fat and calories, and a portion is one of your five-a-day! YES, that's right. ICE CREAM CAN BE ONE OF YOUR FIVE-A-DAY. This is a totally natural and vegan recipe and anyone can enjoy it. If you only try one recipe from my blog, this super easy, cheap, healthy, nutritious recipe has to be the one! The recipe below will make two portions, or six small scoops!

You will need:

  • 3 medium bananas
  • 3 tablespoons of almond milk
  • Natural honey for topping (optional)
  • Almond flakes for topping (optional)
Steps:
  1. Remove the banana skins and cut them into reasonable thin slices, about 2 cm in width. Place the slices on a plate and put in the freezer for about an hour and a half.
  2. After 1.5 hours, remove from the freezer and place the banana into a blender, or place in a bowl and use a hand blender. Add the 3 tablespoons of almond milk and blend until you have a smooth texture.
  3. Place the mixture into a bowl and put in the freezer for at least 1.5 hours before serving. The ice cream is then ready to serve up whenever!
  4. Add your desired toppings. Honey and almond flakes work perfectly and compliment the subtle flavour of almond in the ice cream from the almond milk. And enjoy!
I hope you enjoy this recipe and don't forget to leave your comments below!

Friday, 1 August 2014

Flourless banana and peanut butter cupcake puddings!


So after the portobello mushrooms and scrambled tofu, me and my friend thought we'd make some sweet banana treats, but a healthy, flourless version! Of course, these don't rise as well as if you add flour and they do deflate a little as you can see in the images, but they have a texture and flavour of their own, they're mini puddings really! They have a lovely moist texture and heated in the microwave for 30 seconds, topped with honey and/or peanut butter, they make a really delicious healthy pudding. And they're super simple too! Here's how to make them in 5! This recipe will make 8 little mini banana and peanut butter puddings.

Cooking and preparation time: 18

You will need:

  • 2 small bananas
  • 6 tablespoons of peanut butter (or other nut butter)
  • 1 large egg
  • 1 teaspoon of vanilla
  • 1/2 teaspoon of baking powder
  • 2 tablespoons of honey
  • 8 cupcake cases
Steps:
  1. Preheat the oven to 180 degrees Celsius. 
  2. Simply mix all of the ingredients together and put in a blender or use a hand blender to mix smoothly.
  3. Spread out 8 cupcake cases on an oven tray or cupcake tray and spoon 2 and 1/2 tablespoons of mixture into each cupcake case and place the tray in the centre of the oven.
  4. Put the timer on for 13 minutes or remove them from the oven once they are golden-brown on the top.
  5. Place on a cooling rack or serve up and enjoy warm with honey and peanut butter, enjoy!
I hope you like this recipe and please don't forget to leave your comments below!


Tuesday, 29 July 2014

Quick and easy, 4 ingredient banana and honey oaty bakes!


I had some bananas left over from the market groceries that have gone soft so I was thinking of ways to use them, and I haven't posted many healthy treats yet, so I thought I'd make some oaty bakes/bars. It's a great way to use up over-ripe or soft and bruised bananas. These are super easy and only require 3/4 ingredients! But of course you can add you own, such as nuts and dried fruits for extra flavour. To make this recipe simpler, I've used 'mug' measurements so that you don't have to measure anything out or weigh any ingredients. Also, I actually used plain porridge oats for this recipe, which actually work really well, so don't worry about the kind of oats you use.

You will need:
  • 2 large ripe bananas 
  • 1-2 mugs of oats
  • 2 tablespoons of honey
  • 1 teaspoon of vanilla extract
  • A square of baking paper/a greased tin
Steps:
  1. Preheat the oven to around 190 degrees. Take a square of baking paper and place on a tray, or grease a tray well using butter followed by covering with flour.
  2. Remove the peel from the banana and place both bananas in a large mixing bowl. Use a potato crusher to mush the bananas until you get a thick paste with minimal lumps.
  3. Depending on whether you want moist bars, or crunchy ones adapt the number of oats. I used just one mug because I wanted my bars to be quite moist and more of a dessert, than a crunchy bar. But if you're after bars to pack for work etc, use two mugs of oats. Add the oats to the mixing bowl and mix thoroughly with a wooden spoon. Add two tablespoons of honey and a teaspoon of vanilla extract and mix well again.
  4. Empty the mixture onto the baking paper and pat the mixture into a square/rectangle shape if you are looking to make bars. Or get creative and fashion the mixture into shapes using cookie cutters.
  5. Place the tray in the centre of the preheated oven and bake for 20-25 minutes. Regularly check that the bakes aren't burning. If they look golden-brown before 25 minutes, remove them from the oven. If the edges darken, this is not a problem.
  6. After 25 minutes the bakes may not look golden-brown on the top, so for a crunchier outside and a more moist inside (depending on the number of oats used), you can grill the top of the bakes on a medium heat for 3 minutes. To do this, remove the bake from the baking paper by turning it upside down onto a plate. Quickly grease the plate with some butter and flour and place the bake onto the greased tray (if tray already greased and paper not used, this isn't necessary). Place under the grill on the highest level for around 3 minutes, making sure that it doesn't burn.
  7. After they have turned golden-brown on the top, remove from the oven and turn upside down onto a plate to cool until serving. Or serve warm with ice cream or frozen yogurt as a delicious dessert.
  8. Drizzle with honey or sweetener and enjoy!
I hope you enjoy this recipe and please don't forget to leave your comments below! :-)

Tuesday, 22 July 2014

Nature Valley Vs. Medley (healthy bars)!


Now both of these bars, the 'McVities milk chocolate and raisin Medley bar' and the 'Nature Valley sweet & nutty peanut bar' were on a promotional offer, so I decided to trial them both and do a little comparison! 

The Medley bars come in at 127 calories with 10g of sugar and many, many other ingredients! Perhaps I didn't try the best flavour of Medley bar, but I wasn't too impressed by these... I found them quite stodgy actually and was put off by the huge list of artificial ingredients! 

Secondly I tried the Nature Valley bars and hoped for more! These bars are higher in calories with 150 and also have 10g of sugar, but these calories are coming from the right places as nuts and oats tend to have a fairly high calorie content but are packed with nutrients and at least 44% of the bar is made up of peanuts and oats. These bars are delicious! If you enjoy nuts, peanut butter and/or oats you should definitely pick up one of these to try! Also, peanuts are a great source of protein and iron! I don't recommend making these part of your daily meal plan, but as a semi-healthy treat, I think they're great. Besides, they're super tasty!

Finally, the Nature Valley peanut bars are great, but I'm still yet to find a bar I love more than the 100% vegan, 100% whole-food Nakd bars! Check out what I've said about them by clicking here!

Monday, 21 July 2014

Product review - Nakd bars!


Now these are truly amazing! Definitely in my favourite healthy food item EVER! They're worth every penny!!

Health wise, there is not a SINGLE downside to these bars. They're 100% raw, whole foods! The image to the left shows a 'cashew cookie' bar (my personal favourite) and these bars contain cashews and dates. And that is all they contain. Every time I have one of these bars I'm completely amazed that that's all that they contain. Depending on which bar you try, there are a variety of benefits such as a source of protein, fibre and other nutrients. As well as the health benefits, they're delicious too! And they're 100% vegetarian and vegan, free of gluten, wheat and dairy, so almost anybody can eat them.


I whole-heartedly recommend these to anybody! Pick up a few different flavours to find the one you like the most. 

On the Nakd website at the moment there is a promotional offer where you can this  box of 18 assorted Nakd products for just £10 - definitely something for new customers to try. They also offer free delivery, so all-in you would pay £10 for this whole box of goodies! 

Don't forget to leave your comments below!
You may also like